But if you want to know how I made my buttons, I'll tell you in 6 easy steps :). By time I'm done with you guys and dolls you all will be button making machines!! Take that fancy blogs who think the blogosphere revolves around them!
Anyway.
First thing you want to do is go to iTunes and download the following app:

Badge Maker by Kouichi INAFUKU
The image to the left is so you guys and dolls will know what to look for. It costs $1.99 and is worth it and rewarding but only if you want it to be. So that's strictly your feelings. If you don't want to pay for it, you don't have to stick around and you can leave this tutorial.
Those of you that decided to spring for it, good for you!! Those of you want to know what's going on, glad you came (ba dum tshh!) lol. I promise you won't be disappointed like the other iPhone apps out there lol.
Step 1
After you've successfully downloaded the Badge Maker app, go to it on your Apple device and launch ("open" just in case) it.
Step 2
You will now see the screen below. The circle is where the image will go so you can make the badge. The darken or shaded area around the circle won't be show or basically cut off. So now hit that PHOTO button in the menu below.
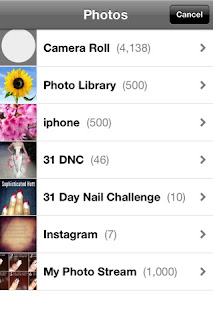
Now select an image from your Albums or take a picture of something you fancy or find interesting.

Side Note: You see that, damn near 5,000 photos....I need to clean it off before it starts to lag on me again, took me 3 hours to get the pictures off last time lol. Anyway I used a picture from my Camera Roll album.
Step 3
Now that you've chosen your picture, it will look similar to the one below depending on the size of the image. The below picture is a wallpaper so it's pretty large. With the "pinching" effect, re-size the image, just like you would do with any of your other photos or iPhone activities lol. Once you got the circle filled, find a section of that picture you want to focus on the most.
Step 4
Once you've got it the way you like. You can now add text, which I can say is really tricky and hard and you'll even end up moving your image out of it's original position. Just be patient and eventually you'll get the hang of it.
Tip: To change the text color from the default, double tap the text and the text menu will appear at the bottom and then hit the back button when you're done.
Now hit Preview in the upper right hand corner. You'll see a new menu.
Step 5
Tip: Before you get too frisky or cocky, The Save button does NOT save it to your photo album like most images are saved. It saves it within the app so you can later go back and add the buttons to images or hey, do some marketing and add it to one of your photos and post it on your social network of choice.
You want to send it to your email or an email you don't use much. Reason being, it sends you the .PNG File version. Because of the update, saving it to the photo album saves it with a white background, that means extra work of having to remove the background. And we don't want that right?? So Email it to yourself.
Step 6
Once it's been saved or sent via email, you will get a confirmation screen. Then all you have to do is go to your email, download/save it to your computer. If you're using blogger interface you can manually upload here for a link. If not then head on over to Image Hosting site of your choice (I use Imgur) to get a URL Link.
And now you're done, you've got a button and all you have to do now is put it with the code and post it to your blog or website. To get the code please click here. To find out how imgur works or you happen to get your button with a white background instead, click here.


0 comments :
Post a Comment
What do you think?